Instrument transformers are part of the measurement circuit for transformer operated meters. If the resistance in the measurement circuit is higher than stated on the transformer nameplate, the transformer might deliver a value lower than from the ratio factor excepted.
Usually the measured burden for current transformers shall be within 5 % to 125 % of the rated burden on then name plate. For Voltage Transformers the operation range is between 80 % and 120 %.
Safety First!
![]() Never leave the secondary side of a current transformer open. It can cause a high voltage of several kV. You can find a good description for the reason here.
Never leave the secondary side of a current transformer open. It can cause a high voltage of several kV. You can find a good description for the reason here.
We recommend the use of "test disconnect terminals" or current measurement via clamp-on CTs.
Always maintain the general safety rules.
How to measure the Current Transformer (CT) burden?
We are using for measurement our portable calibrator RS350 together with a clamp-on CT.
Preparation
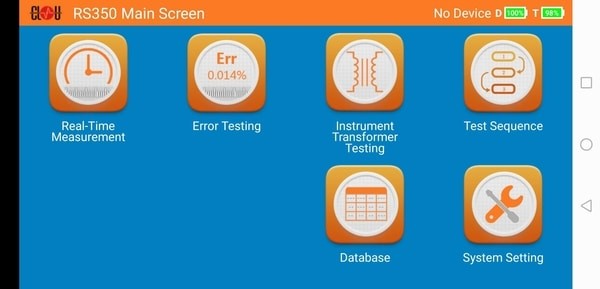
Open the RS350 Android application on your tablet and click on "Instrument Transformer Testing".
In the opened window you click on "CT Burden" in the menu at the bottom and on L1, because we want to test phase 1 first.
Fill the row with the Rating plate info. The values are printed on the CT.
We have:
– Ip = primary current
– Is = secondary current
– VA = rated burden
– Accuracy = accuracy class of the CT
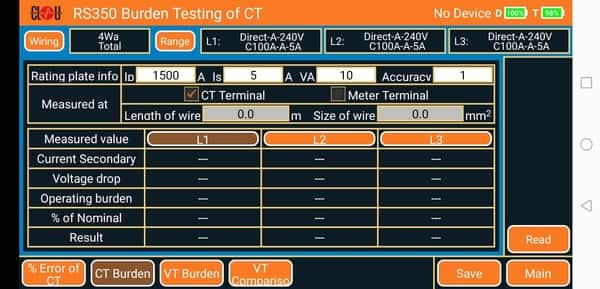
If you have access to the secondary terminals at the current instrument transformer, activate the checkbox "CT Terminal".
If the CT terminals are difficult to reach, activate the checkbox "Meter Terminal"
Since the wiring represents an additional resistance which must be included in the result, we need to feed some more information:

We need to enter the total wiring length to the meter and return to the CT, and the wiring cross-section. This is usually 1.5 mm2 or 2.5 mm2 .
Once these settings are done, we can connect the wires for the measurement to the RS350. We are measuring phase by phase. The connections on the RS350 are always on phase 2 (L2).
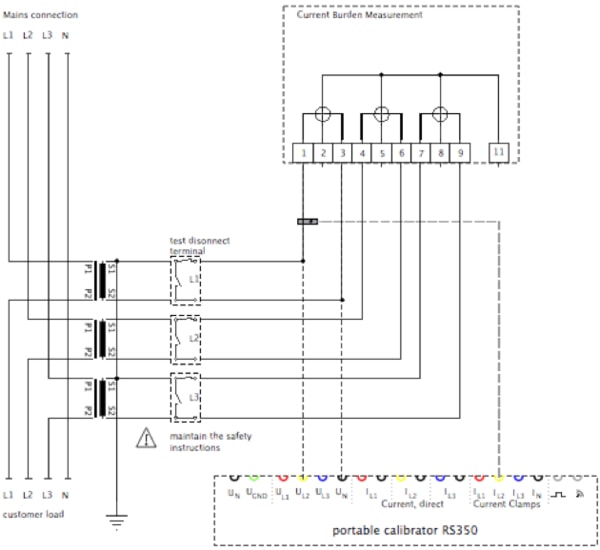
So, you have on the RS350 side the following connections:
– one clamp-on CT, connected to IL2
– one yellow safety laboratory cable, connected to UL2
– one black safety laboratory cable, connected to UN
Put the clamp-on CT on the wire which is going to terminal 1, the arrow on the clamp shows to the meter.
Connect the yellow laboratory cable with S1, if you can access to the CT terminals. If not, connect to terminal 1 at the meter (and include the wiring length between CT and meter in the settings).
Connect the black cable to S2 or to the terminal 3 of the meter. (Similar to the yellow cable).
Use crocodile clip or similar to connect to the terminals. Don't open the terminal screws!
Now the RS350 can measure the current and the voltage-drop in the current circuit. Click on the "Read" button. The resulting consumption (burden) is calculated and indicated automatically.
Repeat the procedure for phase L2 and L3. Change the wiring only at the meter side. The RS350 input remains on L2 for all 3 phases.
For proper report recording select the phase under test in the row "Measured value".
This is the simplest way to do a CT-burden measurement and used by most utilities. If you are experienced and you have the possibility to shorten the secondary current temporary by a switch-board, you can use for current measurement the terminals IL2 instead of the clamp-on CTs. This is not recommended for beginners due to safety reasons! Be sure that you know what you are doing when you want to measure the current direct.
For the video we used our experimental laboratory environment. The CT was rated 750 A / 5 A. To get enough current for the primary side, we used 3 primary turns, giving us 300 A on source settings with 100 A. The voltage-drop measurement was taken by crocodile clips from the meter.
How to measure the voltage instrument transformer (VT) burden?
Open the RS350 Android application on your tablet and click on "Instrument Transformer Testing". Then select "VT-Burden"

The settings are indicated on the VT-nameplate.
– Vs = secondary voltage
– VA = rated burden
– Accuracy = accuracy class
Once you have entered the settings, you can connect the RS350. We are measuring all 3 phases together, so we connect:
- RS350 UL1 to the voltage input terminal L1 of the meter
- RS350 Clamp-on CT L1 is clamped on the voltage wire for phase 1, preferable close to the meter terminal.
- RS350 UL2 to the voltage input terminal L2 of the meter
- RS350 Clamp-on CT L2 is clamped on the voltage wire for phase 2, preferable close to the meter terminal.
- RS350 UL3 to the voltage input terminal L3 of the meter
- RS350 Clamp-on CT L3 is clamped on the voltage wire for phase 3, preferable close to the meter terminal.
- RS350 UN to the Neutral terminal of the energy meter
The test results for all three phases are shown immediately on the display.
Thank you for reading. Share your experience with us and other users.
Editor's note: This article was originally published in May 2021 and has been updated for comprehensiveness.


Excellent text, but there is no economic impact shown with every step out of nominal burden.
It is practical to do the analysis over one unit in MT like 13.200V and 100KVA.
I have the experience of several years working on billing metering and I saw a lot of errors like wrong CT ratio introduced to billing!
Regards and thanks a lot.
Ivan
Ivan, thank you for the competent comment. This article doesn't cover commercial aspects. I covered some impacts in another blog.
You highlighted a very typical case, wrong CT ratio. In addition, with electronic transformer operated meters I found a lot of cases with wrong programmed ratio in the meter. So it's essential to verify CT and CT/VT installations complete and regularly.
Best wishes and sty safe,
Lao